How We Built a Deck
- Jul 10, 2022
- 4 min read
Updated: Jul 16, 2022
I always wanted to have a pretty deck in our backyard. However, our house is split level and both the kitchen and living room are facing the front yard, so due to accessibility issues, we were putting off this project. We thought multiple times about adding the sliding doors to the bedroom and having a deck attached to it but the cost of all that work didn't make the sense.
After some thinking, changes in the circumstances, and spending more time at home, the desire of having a pretty outdoor space grew. So as Spring One Room Challenge came closer, we decided to pull the plug and build a ground-level deck.
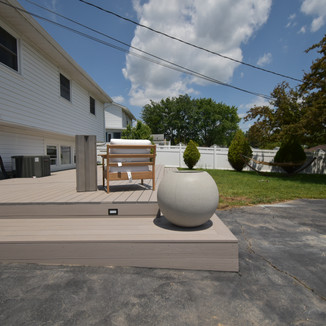
The design was very easy to come up with as I knew exactly what I wanted. I have been drawing this picture in my imagination since I first saw our backyard. I wanted a modern-looking, ground-level deck, ideally in a darker color (to be exact I was obsessing over AZEK Dark Hickory composite decking). Furthermore, I knew I wanted one large step with the integrated deck lights.

Unfortunately, the color that I wanted was back ordered but fortunately, when I thought longer about it, I realized the color wouldn't have looked good with our white vinyl house and light gray roof. So, we went with the Slate Gray color that was in stock and ready to go. We got all the materials on Saturday morning and started building in the afternoon.

Step One // Measure & Mark
we went around the area, where we wanted a deck to go, and measured everything. Once, we had all the measurements down, we calculated how many posts would be needed and started marking the holes with spray paint. After everything was marked, we started digging. Each hole had to be 30" deep and we had to dig 12 of them, for someone with nonexistent arm strength like me, it was a tough job. And eventually, James had to do most of the work.


Once all of our holes were dug we began to prepare the beams. Working left to right we used a string line with a level and began cutting posts to make a level beam. Then dropped a specifically designed footing pad in each hole. The footing pad can be used instead of the concrete to secure the beams. It's a relatively new product in the deck-building industry and due to its relatively high price point, compared to concrete, most deck builders avoid using it. However, for us, avoiding the mess of using the concrete was worth every penny.


Step two // Putting the base together
Next, we notched the posts using a circular saw and a reciprocating saw. Then attached the beam making sure that all the seams in our double 2x10 beam landed over a post. Then, we attached joist hangers every 16" on the beams and installed the 2x10 joists.


Step three // Attach the deck boards to the frame
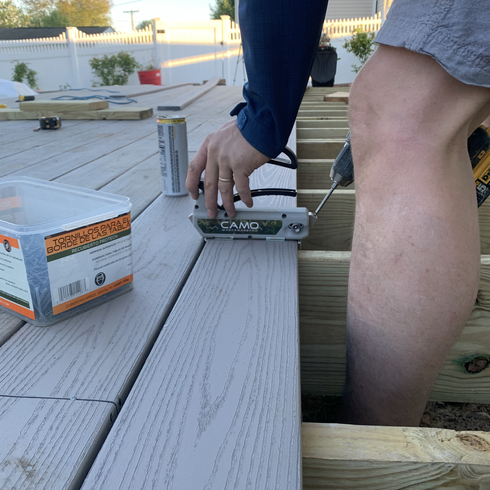
Once the joists were hung, we began to lay decking using the CAMO hidden fastener system. Due to the size of our deck, we would never find a board that was 34' long, so we decided to go with the scattered seam design. In order to achieve the design, we basically had to watch closely that every seam we created didn't form any pattern; which ironically, is much more difficult than following a pattern. So once we placed a seam on one joist, we made sure not to land another seam near that joist for a while.


Step four // Attach the Steps & Add Lighting
We repeated the same process to build the step, but instead of using 2x10 framing, we used 2x8. First, we created the frame and before putting the boards on, we wired the deck-step lighting system and made sure all was working right.


// Final Touches //
Once the entire deck was built we were pretty happy with the results and gave it a nice power washing which brought everything to life and is ready for use.


//Some Thoughts//
If we could go back and change anything, we would have done the joists on 12" on center. Although this would cost a few more joists, it would remove the little bit of bounce our deck has and made a concrete feel when walking across. However, with our current alignment, there is minimal bouncing, you can do jumping jacks and it won't move much.
!IMPORTANT!!
** Don't forget to check your local code as every area has different frost lines and different regulations for framing**
Tools & Materials Used In This Project:
//Tools:
Digging Bar (or you can make your life easier and buy the Post Hole Digger tool)
CAMO tool & CAMO Screwdriver Bit
//Materials:
Decking Boards - Azek, Slate Gray
Galvanized Carriage Bolts (7-inch one) & Galvanized Flat Washer & Galvanized Hex Nut


Comments