How We Built A Dining Room Bench
- Feb 14, 2023
- 6 min read
From the start of our kitchen renovation, I had a vision of creating a corner breakfast nook (for us it would be a dinner nook too). However, finding the perfect bench at a reasonable price point proved quite challenging. After a lengthy search, I realized that the only way to get the look I was going for was to DIY. With this decision made, I began seeking inspiration and collecting ideas for the design. I scoured vintage and design websites for a few weeks creating a mood board for my favorite benches.
// The One that Inspired //
Midway through my search, I came across this custom bench in one of Amber Interiors’ recent projects and completely fell in love with it. Well, I'm in love with everything she comes up with...

Typically, I steer clear of copying the designs of other designers, but this bench was an exception. It had a perfect balance of modern and vintage elements, with a harmonious blend of feminine and masculine lines. I was so inspired by this bench that I decided to use it as the foundation for our dinning nook bench design.
// 1. Measure and Visualize //
Most people begin their projects by first taking measurements and then imagining how the item will appear in the space. However, I (aka my brain) have little bit unique approach. I prefer to visualize the object first and then take measurements. For bigger projects, I use 3D modeling software but for personal projects like this sometimes it's fun to do all the measurement in person.
Over the years of renovation and design, I have mastered the use of painters tape to map out the object in the intended area and evaluate its appearance in the space.
For this bench, I started by visualizing with my favorite painters tape trick. I initially covered an area of 4' by 6' ft in the corner, but upon further evaluation, I realized that it was too large for the table and space, so I reduced the measurements to 4' by 5' ft. For the depth and seat height, I followed standard dining bench measurements, 2' ft deep and 18 inches high from the ground.

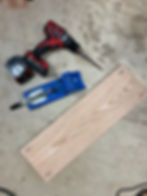
// 2. Get Supplies //
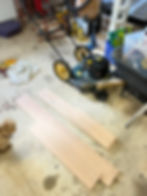
After finalizing the measurements, we headed to the home improvement store to purchase the necessary supplies. I had determined that I wanted to use red oak to match the wooden accents in our kitchen. The most challenging part was finding round legs made of oak, but we got resourceful and explored other departments, where we discovered 12 ft oak handrails that were ideal for the project.

// 3. Make the Cuts
// A. Bench Legs:
To begin, I started by constructing the legs of the bench from a 12 ft oak rail. I required a total of 6 legs - 3 short 18-inch legs for the front and 3 longer 36-inch legs for the back.

// B. Wood Side Pieces:
After cutting the legs, I moved on to cutting the side pieces using 1-in x 8-in x 8-ft red oak boards. I required a total of 6 pieces: 3 side and front pieces at 22.8 inches each, 1 piece at 34.5 inches, 1 piece at 58.5 inches, and 1 piece at 46.5 inches. Once all the cuts were made, I arranged the design to ensure that it looked good and all the pieces fit together properly.

Very important step that I would highly advise for all DIY building projects is dryfitting!

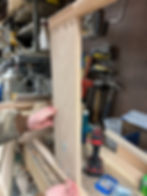
// 4. Make the Grooves on the Legs
The most challenging part of this project was shaping the grooves in the round legs. Creating a straight line on a round object turned out to be much more difficult than anticipated. We did some online research to find the most common practices, and after reading some blogs from metal and woodworking websites, James discovered that clamping a piece of angle iron to the dowel (in our case, the oak rod) would make the process easier. With our newly acquired knowledge, we got to work.
We started off marking all the areas that we had to drill.


Then James put a 3/4" forester bit in the drill press and set the depth to 3/4" and slowly drilled holes in a straight line until the depth of the leg support was met. Then he moved the leg to the work bench, secured it with the clamps and started squaring the slots out using various sized chisels. To be honest this was the most time consuming part of the project.
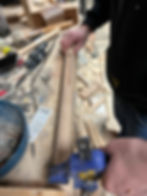

After few hours of drilling and chiseling, legs were ready to go!
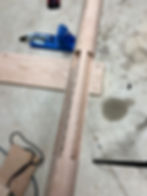
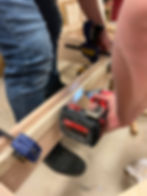
// 5. Drill the Pocket Holes
To put the leg support side pieces together with the legs, we decided to use pocket screws and wood glue. However, prior to gluing everything together, I needed to drill pocket holes into all the wood support pieces using a Kreg Jig.


// 6. Put it all together
Once all pieces were ready, it was time to glue and screw everything together. First we put the wood glue inside the grooves and then secured everything using the pocket screws.


// 7. Cut and Add the Plywood
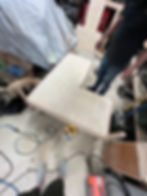
Once the frame was complete, we added a narrow 2 inch wide and 3/4 inch thick strip of plywood inside the bench to provide support for the larger plywood piece that would form the bench top. To attach the support, we applied wood glue to the strip, secured it in place with wood clamps, and then reinforced everything with drywall screws.

After reinforcing the interior of the bench structure, it was time to add the seat support using 3/4 inch thick pine plywood, which was cut to size using a circular saw.
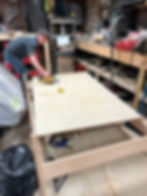
We attached board with the drywall screws using the impact gun.

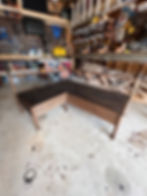
// 8. Add Back Support
The last step was to add the back support, for which we opted to use a 1.25 inch thin round oak dowel rod instead of the handrail as we wanted it to be fully round.
To install the dowel rod, we drilled the hole on the back of the bench using woodboring forstner drill bit and put the dowel rod in the drilled holes. We secured the rod using the wood glue.


As the final touch, we added the finials on top of the back legs of the bench.
And this was the end of the building part of the bench.
// 9. Finishing Touches
Once we were 100% happy with the bench structure, we smoothed out all surfaces by sanding it with a 220 grit sanding pad. This ensured that there were no drips of wood glue or bumps on the surface. I have learned through experience that it's crucial to thoroughly sand off all remnants of wood glue. If there is even a tiny bit of residue left, the stain won't adhere properly and you'll end up with an uneven finish on your furniture.
After sanding, I wiped the bench clean with a microfiber cloth and vacuumed to remove any dust. Then, I applied a single coat of Minwax Dark Walnut stain using a rag, blending it in and removing any excess with another clean rag. I let the stain dry overnight before lightly sanding the surface with 320 grit sandpaper, removing any dust and applying a protective coating. I repeated this process three times, with a light sanding and dust removal in between each coat.

Adding protective coat is must, especially if the furniture piece is going to be places in the high traffic area, so make sure you pay extra attention to this part.

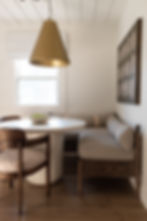
// Final Product
Once we finished the bench structure, I made the cushions, long lumbar pillows for the back support, linen covers and the leather belt holders to secure the back pillows on on the back support rod. I will be writing separate tutorial for the accessories. But below you can see the finished product.


If you are not up for DIY, here are some of my favorite benches:
Tools & Materials Used in the Project:
Materials Used:
Red Oak Dowel
3/4" thick plywood
Oak Finials (we used 3)
Sanding Pad - (220 Grit) (320 Grit)
Tools Used :
Kreg Jig For Pocket Holes - Large one (one we have) ; Smaller Version
Impact Tool - Our favorite; Budget friendly version
Electric Sander ; Cordless Electric Sander (our all time favorite)
Let me know if you have any questions!
Xoxo