DIY Plaster Fireplace
- Oct 30, 2022
- 7 min read
Updated: Oct 31, 2022
I can happily announce that we are done building the fireplace! The fireplace was the largest and most complicated part of our living room makeover and having it crossed out of the checklist feels truly amazing.
It actually took me a few months to settle on the final design for this fireplace, I had tons of different ideas. Some of them were very extravagant and some of them were pretty simple. As I've talked about before in my previous blog posts, our current house is not our forever home and neither is a high-end luxury house so every time I make renovation and design choices, I take all previously mentioned factors into the consideration. Basically speaking, I imagine the average next owner and make decisions based on that. Considering all the factors, we settled on the plastered fireplace with a brownish brick inside. As for the insert, instead of putting a standard electric fireplace insert, we decided to go with the electric log insert to give it more character.
Here is a step-by-step guide to how we built it.
Table of Content:
// Fireplace Term Glossary //
As I started writing this post, I realized that I don't know the terminology of the fireplace parts. So, after little research, I created a little fireplace glossary for reference.

// Fireplace Insert Plan //
We measured out our living room and put the measurements into SketchUp. Once we had our virtual living room, we played with different shapes and sizes until we found one that both I and my husband liked and worked best for the room. Which was very different from what we initially envisioned.
Tip: If you want to see the fireplace's magnitude and design before committing to it, I would highly recommend taping it on the wall using painter's tape.
// Find the studs //
Once all the design plans were finalized, James using the stud finder, found and marked the studs behind the wall where the fireplace would go up.

// Building the Frame - Bottom Front //
After marking everything, he started building the fireplace structure. The simplest method to framing the shape we wanted, was to frame a three-sided box that would attach to our living room wall.
First, he framed the bottom front part. He took 2x4's and cut the edges using the miter saw to even the wood pieces out and then started cutting the size he needed. Then he joined everything together using the nail gun.


// Building - Bottom Sides & Joining Together the Bottom Part //
Once the front part was done he made 2 side pieces, using the same technique, joined all three of them together, and attached them to the wall.


// Step 3: Build the Top Frame //
For the top frame, he put 2x4s from the framed box all the way to the ceiling at a predetermined 5-degree angle. Due to our poor math skills, we used Sketchup to tell us what angles and lengths we would need but anyone with a middle school math education could do without it.


In the end, he added a few pieces of wood in the middle to strengthen the front of the fireplace.
// Step 4: Add the Mantel //
Adding the mantle turned out to be the easiest part of the project. All we had to do was wrap the top of our framed "box" with 2x4s until the desired depth was reached, which for us was 3".


// Step 5: Build the firebox //
Once we were done with the framing of the fireplace structure, we moved on to building the firebox. We decided to use brownish brick tiles on the side walls, to add more texture and character, and 3/4" plywood for the base. Due to the firebox dimensions being below 16", we didn't have to add any additional framing to the fox. Since we wanted to tile the firebox walls with brick tiles, we had to use the concrete sheet.

first, James attached a 3/4" piece of plywood on the bottom with normal drywall screws, then moved on to adding concrete back and side pieces.
To add the concrete ("hardy board") to the box, he first cut the back piece, put on the liquid nails, and attached the piece to the wall. Once the backboard was secured, he added few screws for extra security. Then moved onto the side pieces, which he attached to the frame using the drywall screws. For the sides he didn't use the liquid nails.


Once everything was up and secured, this is how it ended up looking.

// Step 6: Add Brick To the Firebox //
Once the firebox was ready, it was time to put up the brick tiles. Brick tiles are installed in the same exact way as normal ceramic/porcelain tiles. Although nowadays there are many different ways to attach the tile to the concrete board, we decided to go with the old-fashioned way and use mortar.

First James mixed the mortar and smeared it to the sides and the corners. Then he spread the mortar using the trowel on the concrete board. To attache the brick, he first put some mortar on the back of the tile and then attached it to the board.
Tip: When you attach the tile to the surface, jiggle it a little bit to get rid of all the air bubbles.
The toughest part was finding thick enough tile spacers, so we just doubled up the thickest of the ones we could find.

We didn't precut the tile pieces, instead we kept the normal tile cutter next to us and made the cuts as we went. Fortunately area of the firebox was relatively small, so we didn't have to do many cuts.

After we finished the tiling, we left it for about 24 hours to dry and then took out all the spacers and scraped off all the excess concrete. We intentionally left the spacers till the concrete dried as we were not sure if we wanted to grout the brick or not. Although initially, we planned to grout the brick, once it was all up, we liked it the way it looked so much that we we skipped that step for now.

// Step 7: Add Drywall
After finishing the firebox we moved on to adding the drywall. We used 1/2" lightweight drywall with 1 - 5/8" screws and installed it from the bottom up.

// Step 8: Add Corner Bead Tape Along All Edges
Once we finished putting up the drywall we added metal corner beads on all the edges.


// Step 9: Tape and Add Joint Compound
Once the drywall was up and the corner beads were in place, it was time to put the drywall mud on. This is usually the my most dreaded part of all our projects but also unavoidable.
First we put drywall tape on all areas where we had the seams and then we moved onto adding the compound on the other areas. We tried to keep it to the minimum but it still took us about 3 coats to get the perfect finish. We left each coat to dry for about 24hrs and sanded uneven parts before putting the new coat on.
We used both the drywall sander and the drywall sanding block for sanding.


// Step 10: Prime
Once the drywalling was fully finished, I cleaned up everything and put a coat of primer on. I has some leftover Kilz primer left, so that's what I used.

// Step 11: Plaster
For the final finish I knew I wanted the plaster look. Previously, I used the Portola paint's Roman Clay to achieve the textured, plaster looking finish. I absolutely love the roman clay, but unfortunately Portola only has a store in LA and delivery to MD is usually more than the price of the product itself.
So after long research, I decided to go with the Modern Masters - Venetian Plaster in BM Simply White (same color as the walls).

Venetian plaster is much more think and has more smooth shinier finish compared to roman clay. It was super easy to work with and I love the way it turned out.

To put it on, I always used a small stainless steel drywall bucket, 1 steel spatula and 1 plastic spatula. I put small amount of plaster in the bucket and started applying it with the rounded motions to the fireplace. I personally prefer to steel spatula for the first layer and plastic one thereafter.

I applied 2 costs of plaster to give it as much dimension as I could. However, as I used only one color, it gave some dimension but not much. If I could go back I would have put first layer of little bit darker color and then BM Simply white as second coat.

// Step 12: Install the Fireplace Insert
For me the biggest challenge of the project was to find the fireplace insert that would look as realistic as possible and wouldn't cost arm and leg. After spending weeks on searching for different type of inserts and reading the reviews, I decided to go for the electric log insert.


I was skeptical at the beginning but when it arrived it really exceeded my expectations. I intentionally waited to paint or put anything on the bottom of the firebox before the insert arrived. I wanted to make sure it would be most realistic match. Once we put the logs in, I ordered some lava rocks to go around it and I also ordered the fireplace metal cover.


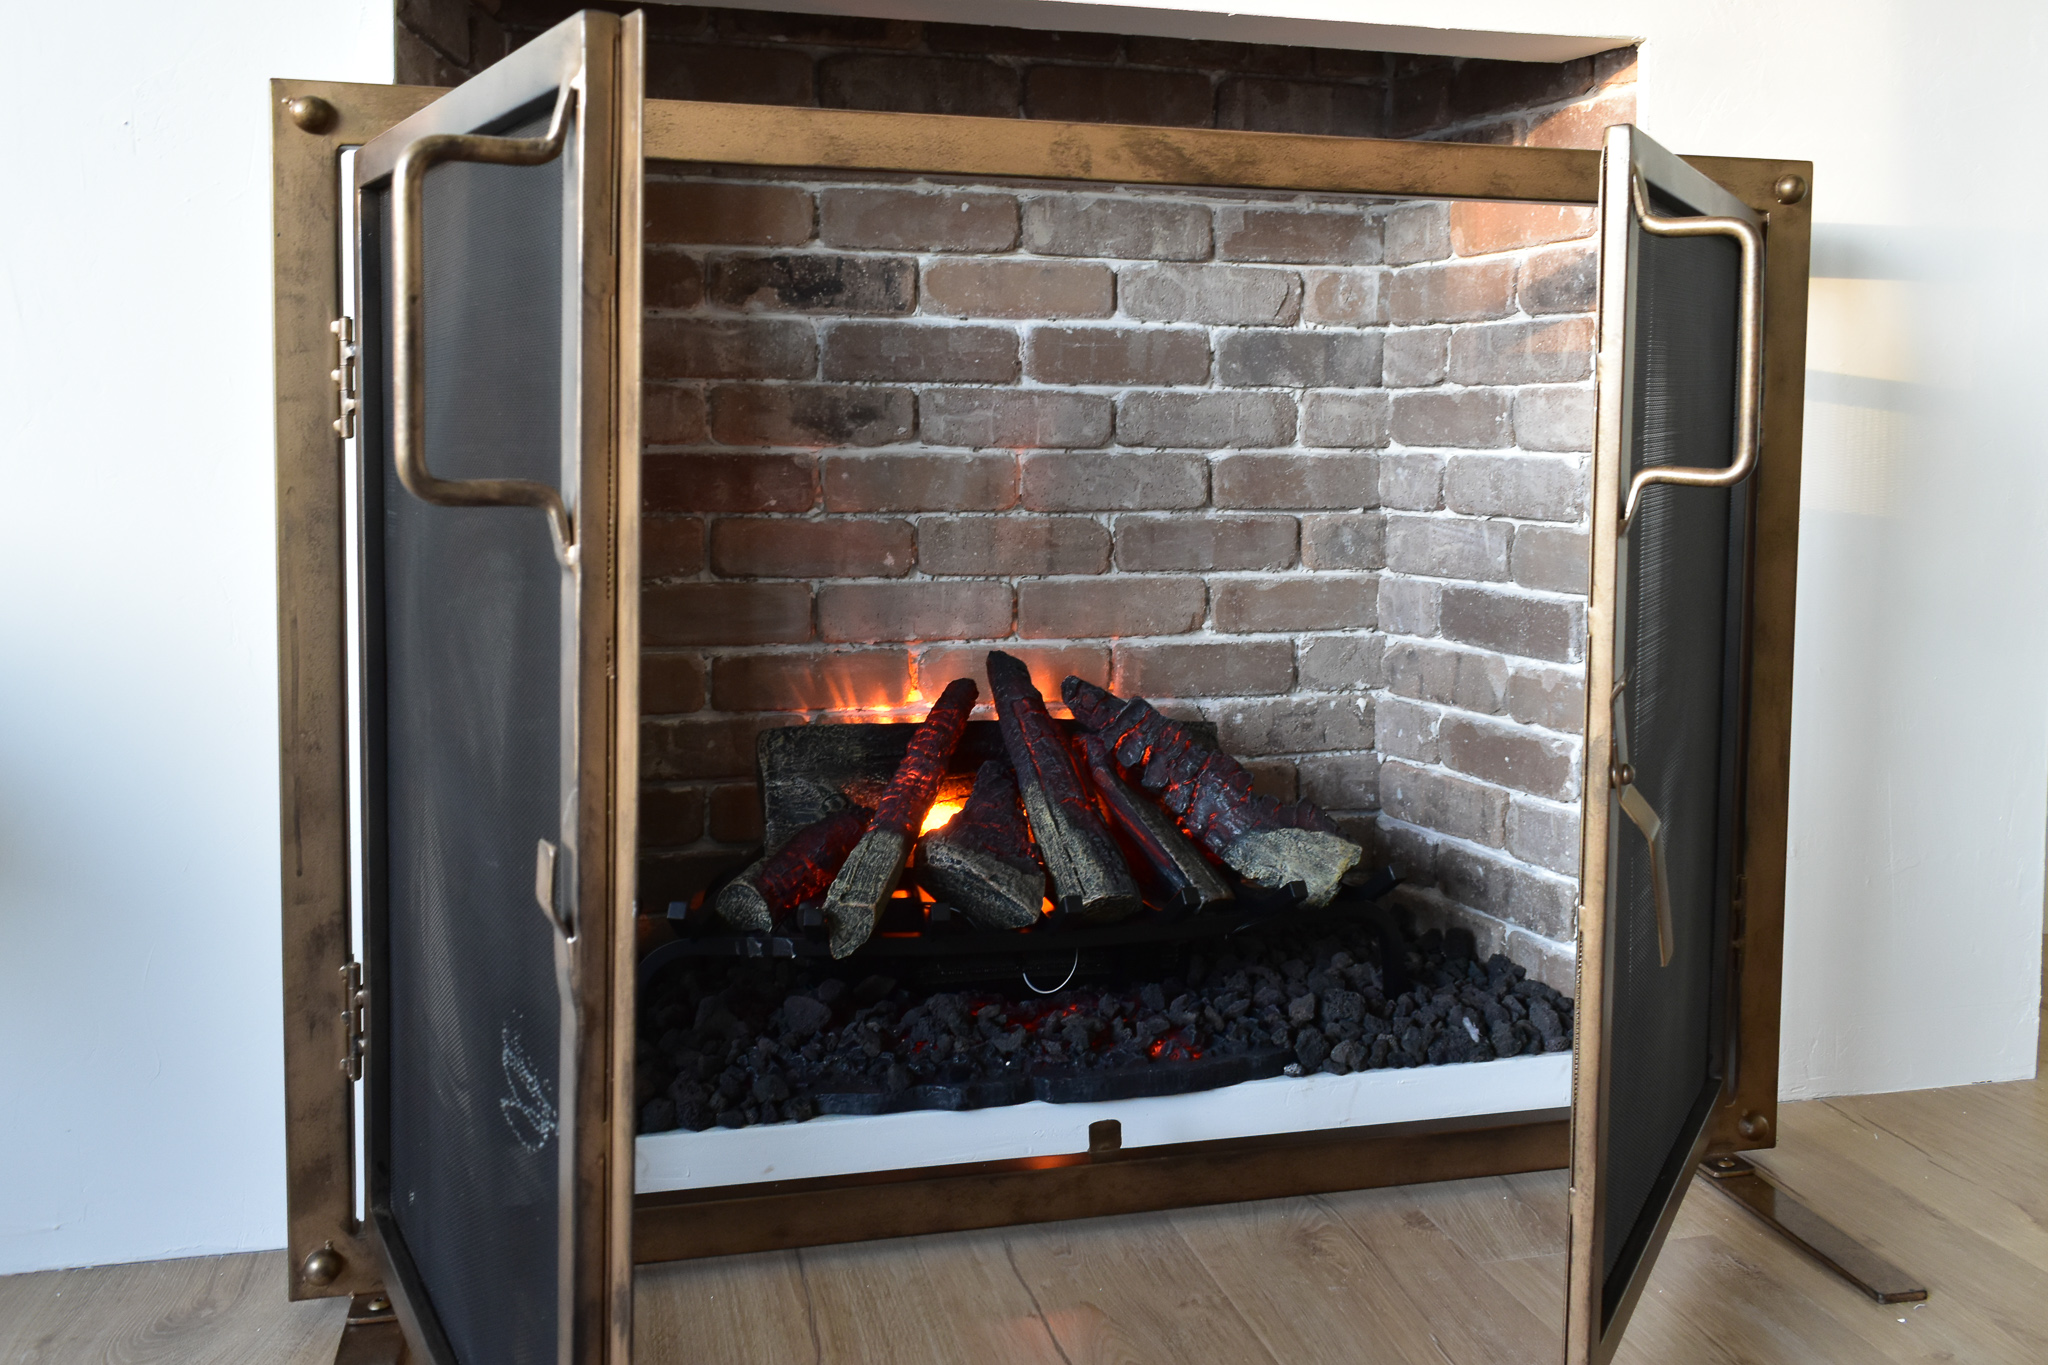
James had to ruin everything by adding TV right away but unfortunately, this is our main living area so we can't get rid of TV, however, I have fun plans of making it look better.

I think it ended up very realistic and was worth every minute and penny we spent!
P.S. I will add more final reveal pictures in late November, once we will be fully done with the living room makeover.
- Materials Used -
- Tools Used -


What are the dimensions of your fireplace. Specially the depth?